Showing posts with label Making. Show all posts
Showing posts with label Making. Show all posts
3/23/21
A Knitted Hat for a Friend...
This is a hat I completed for a friend a little bit ago! I used a soft navy yarn that has great stretch but maintains its shape. I don't knit much these days, but it is so relaxing when I do! I love to listen to an audiobook or watch a movie while I snag a few minutes to knit here and there. In the midst of the hustle and bustle of things, it is important to take care of yourself too! What do you like to do to relax and reset?


8/6/20
Candlemaking
With some extra time on my hands before school starts back up, I dug out some candle making supplies that have been sitting in my closet for some time. One of my favorite gifts I ever received was a candlemaking kit for my birthday many years ago. There was only a little bit of wax left in that well-loved kit, so I decided to finish it off and make something fun with it.


I repurposed some glass yogurt jars that have the cutest shape. I used a scent named "grassy meadows" and it lives up to its name. It smells like grass, but also has a hint of something sweet and fruity to it. Almost like apple, or honeysuckle, or something to that degree. It smells very nice!

After the candles had a while to set up and harden, I pulled out some white vinyl and cut out the words "joy," "faith," and "hope" on the Cricut. Some twine around the necks of the jars finished them off. Now they are ready to bless someone else!
Neither do people light a candle, and put it under a bushel, but on a candlestick; and it giveth light unto all that are in the house. Let your light so shine before men, that they may see your good works, and glorify your Father which is in heaven. Matthew 5:15-16 KJV
3/1/15
Burlap Wreath

2/6/15
Pincushion

As a gift earlier this year, I made this pincushion for my Mom. It's made with wool yarn, so it's good for the pins to "reside" in.

This is what it looks like from the top without pins. It has 4 rings altogether, each with alternating colors.

Side view.....

And this is what it looks like from the bottom.
Have a great day!
Emily
12/2/14
A Baby Blanket.....

I made this blanket for a friend a little while back, who needed a gift for a baby shower. I made it with chocolate brown, lime green, bright blue, bright pink, and purple yarn. It was about 36" square finished.

They yarn was so soft and felt really good on my hands while I was making it.

Have a wonderful day!
Emily
12/1/14
Christmas Stockings......
For this Christmas, I made everyone in my family new stockings to use. In addition to these shown, I made a few more to hang on the railing of our stairs. They look so festive!

This is the stocking that I made for my sister, Elisabeth. She picked out the fabrics herself. They make me think of the Victorian time period. So delicate and pretty!
 This is the stocking I made for my brother, Ethan. He picked out the fabric for it. He LOVES animals.

This is the stocking that I made for my Dad. I think the little snowmen on it are too cute!

This is the stocking I made for my Mom. The fabrics she picked out for this stocking also remind me of the Victorian era.

This is the stocking for my youngest brother, Ean. He loves it!

And finally this is the one I made for myself. I love the fabrics!
Have a great day!
Emily
This is the stocking that I made for my sister, Elisabeth. She picked out the fabrics herself. They make me think of the Victorian time period. So delicate and pretty!
This is the stocking that I made for my Dad. I think the little snowmen on it are too cute!
This is the stocking I made for my Mom. The fabrics she picked out for this stocking also remind me of the Victorian era.
This is the stocking for my youngest brother, Ean. He loves it!
And finally this is the one I made for myself. I love the fabrics!
Have a great day!
Emily
11/28/14
A Soap Cozy......

I made this soap cozy for a neighbor recently, using light blue cotton yarn, and this pattern. I have made lots of soap cozies from this pattern over the years to give to friends, family, and neighbors. What's neat about most soap cozies, like this one, is that you leave the bar of soap in it, and take it in the shower/bath with you. The cotton yarn is soft, but has a little bit of a roughness to it, which serves as an exfoliator. Very neat!
Have a great day!
Emily
1/7/14
Doll Dress.......
The Smocking Guild that my Mom is involved in, was having a raffle for an American Girl Doll with a complete wardrobe. This is the dress I made to contribute to the wardrobe.

It's a pillowcase-style dress made with a Pixie Faire pattern. I made it from a cute pink floral fabric. I have used this pattern a lot and really like it. It sews up very fast and fits the dolls very well.

The pattern for this dress can be found here.

This is the flower I made to go with it. If interested, you can find the pattern here.
Have a great day!
Emily
1/5/14
A New Outfit For Dolly

I recently made this new outfit for a 18" doll. It has three pieces: a shirt, jeans, and a scarf.

I experimented with the different settings on the camera, and this is what came out. The colors POP!

Here are the jeans. I used a Pixie Faire pattern found here. I love this pattern and have made many pairs of jeans using it.

I used my mom's sewing machine to do some decorative stitching on the pockets.....

And the shirt was made with the free Tank Top pattern, also from Pixie Faire.
Have a great day!
Emily
1/4/14
Bookmarks......

This Christmas, I crocheted two of these bookmarks for my Mom. I used a free pattern I found on Ravelry. I used size 10 cotton crochet thread, a size 6 steel crochet hook, and some pink scrap ribbon. They came out really pretty! They look very delicate and elegant. I'm thinking about making some for my Bible too!

Here's a picture of both of the bookmarks together. If interested, you can find the pattern here. I hope to be posting more pictures of items I made as gifts for Christmas very soon.
Have a great day!
Emily
5/6/13
A New Dress For Dolly
I recently made this sundress from some scrap fabric I had. I think it came out pretty cute!

This dress was made from a Heritage Doll Fashions pattern available through Liberty Jane Clothing.

Here's a picture that shows the entire dress. The fabric has a white background with teal flowers.


Have a great day!
Emily

This dress was made from a Heritage Doll Fashions pattern available through Liberty Jane Clothing.

Here's a picture that shows the entire dress. The fabric has a white background with teal flowers.

It ties at the shoulders.

And this is the crocheted flower that comes with the dress to go in her hair! Here's the link to the dress on Etsy .
Have a great day!
Emily
4/13/13
A New Dress For Dolly

The dress pictured above is the Drawstring Dress. I was able to complete this dress in about two hours. The directions are great and it is absolutely adorable. I can see myself making a lot of these dresses for my dolls this summer!
2/8/12
Plastic Yarn Tutorial
I recently learned how to make plarn (plastic bag yarn). It has been really cool making and crocheting it lately. Last night I realized that I shouldn't keep this all to myself. So I figured I would make a tutorial on it. 




What you will need:
*Plastic bags, pretty much any kind will work.
*Scissors
*Ruler (optional)
First, take your bag and lay it out on the table.
Then fold it in half lengthwise.
Fold the bag in half again.
Cut off the handles and the bottom. You can throw these away.
Start cutting strips about 1 in. wide. You can pretty much just eyeball it to see where you need to cut. Measuring is not crucial, but it determines how many strips you will get from each bag.
When you are done it should look like this.
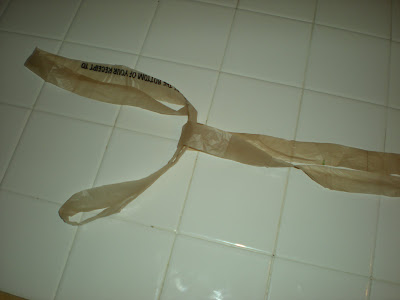
Take two strips and unfold them.
Take one of the loops and loop it through the other one.
Pull one of the loops up through the other loop and pull. Be careful to not pull too hard because we are working with thin plastic which tears easily.
The knot will look like this.
Repeat these steps until you have a big heap of plarn on the floor. Wind the plarn into a ball as you normally would yarn. After that you are free to use your plarn as you please!!!
I choose to make a soap dish with mine. I'm thinking of making it a free pattern.
I think that most people who have not made plarn would think "It's made out of bags it would be too stiff. I don't want to work with that." First of all, feel a plastic bag, it's not rough, in fact it's very smooth. Second, if you use a big enough hook. Plarn is very flexible when crocheted.
So I hope you enjoyed this tutorial.
Happy plarn-making!!!
2/1/10
Pop-cicle Stick Reindeer
This morning I was looking through some old pictures and I found one of this reindeer that I made a while ago.
 It is a couple of craft sticks glued together, some pieces of paper colored brown to look like antlers, ears, and a tuff of hair. Take the glued together craft sticks and glue the antlers, ears, and tuff of hair on top. Then draw on the eyes and the nose,(if you want it to look like ruldolph make the nose red) and the mouth. Sometimes I glue a piece of yarn onto the top of it to make a hanger. They are lots of fun.
Right now I am knitting a scarf. One is definetely needed here right now. It is cold!!!
It is a couple of craft sticks glued together, some pieces of paper colored brown to look like antlers, ears, and a tuff of hair. Take the glued together craft sticks and glue the antlers, ears, and tuff of hair on top. Then draw on the eyes and the nose,(if you want it to look like ruldolph make the nose red) and the mouth. Sometimes I glue a piece of yarn onto the top of it to make a hanger. They are lots of fun.Right now I am knitting a scarf. One is definetely needed here right now. It is cold!!!
Subscribe to:
Posts (Atom)